Table of content
Getting started
On first start-up of the program, the user may choose the name of the episode file that should be edited. Although the name format can be anything, as an episode file is actually a resources file for the Legacy library, it's proper to use the ".rpk" file extension by convention (Resources PacKage). The file name choice interface is also limited to 15 characters max, that is 11 character for the useful part of the file name, if one sticks to that rule.
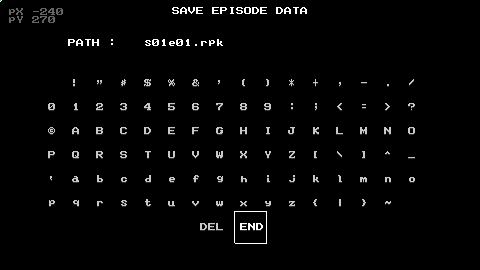
As soon as the file name has been validated, this new file is created in the program folder's "episodes" subdirectory. Any file mentioned using this file name choice interface, existing or not, will be located relatively to this subdirectory.
Note: this same file name choice interface is also used in other contexts, always with the same limitations.
After creating the episode file, it's tagged as the file to be loaded automatically on program start-up.
Note: generally-speaking, the file for the episode being edited at the time the user exits the program will automatically be loaded back on next start-up. To force the program to start without loading the last edited file, the user has to manually edit the "loe.conf" configuration file, located in the program's folder, and remove the "currentResources" property line altogether. (see Configuration section).
The user can now use the program to create an episode, and is presented with the main menu (see Main menu section).
Creation of an episode
An episode is made of a two basic types of structural elements:
- areas, each of them being represented by a visual environment et all the information needed to describe its content
- storyboard phases, that describe events meant to happen automatically at determined moments, most notably for cinematics
Lives Out's editor currently contains 5 edition modes, each of them with its own use rules, and completing others in creating an episode and its components.
To work correctly, an episode must contain at least:
- 1 area
- 1 respawn location for the player in this area
- 1 storyboard phase
So the first step in creating an episode is to create these required elements to start from a minimum functional basis. The main menu offers the necessary options to do that.
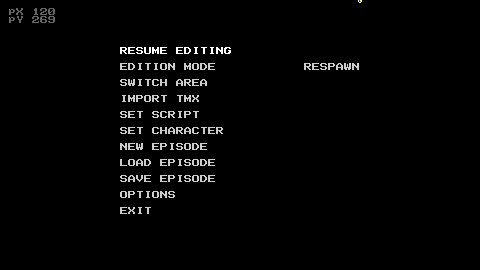
Main menu
It is shown on program start-up and remains accessible at all times using the ESC key.
| Option | Use |
| RESUME EDITING | return to the current edition mode interface |
| EDITION MODE | change the current edition mode (see Edition modes section) |
| SWITCH AREA | change the active area |
| IMPORT TMX | import a TMX format data file, to create a new area (see Areas section) |
| SET SCRIPT | import a TXT format script file, describing dialogues in an episode and additional textual information (see Scenario scripts section) |
| SET CHARACTER | import a PNG format spritesheet for the player character (see Player sprite section) |
| SET LAYER ROLES | assign roles to the active area's display layers (see Display layers roles section) |
| IMPORT METADATA | import episode metadata (see Episode metadata section) |
| NEW EPISODE | close the currently edited episode and start from a clean basis for to edit a new one |
| LOAD EPISODE | choose an episode file and load it within the editor |
| SAVE EPISODE | save changes to the last used file for the currently edited episode, or another |
| OPTIONS | change the program's configuration (see Configuration section) |
| EXIT | exit the editor |
Edition modes
The available edition modes are named "RESPAWN", "ACTION", "NPC", "LIGHT" and "STORYBOARD". The first four work relatively to the active area, in other words any change made by the user impacts only one of the areas within the currently edited episode.
| Mode | Use |
| RESPAWN | manage respawn locations where the character controlled by the player can appear in the active area of the episode (see Respawn section) |
| ACTION | manage action spots spread within the active area of the episode (see Action section) |
| ITEM | manage items that can be collected within the active area of the episode (see Items section) |
| NPC | manage Non-Playable-Characters located within the active area of the episode (see NPC section) |
| LIGHT | manage light sources located within the active area of the episode (see Light sources section) |
| STORYBOARD | manage various scripted scenes of the episode (see Storyboard section) |
Areas
To create a new area, the user needs to import a TMX format data file, that describes the visual environment of the area. The "IMPORT TMX" main menu option allows the user selecting the file. Once the area has successfully been created, it is shown in the background of the program interface, if the user closes the main menu.
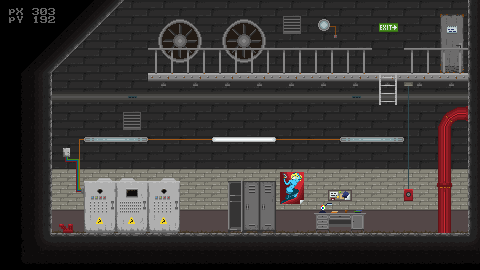
The first area created by the user becomes the active area. As soon as it is done, the first useful thing to do is to create a respawn location for the player character, and one or more action spots. To do that, the user needs to select other edition modes, respectively "RESPAWN" and "ACTION".
In any of those two edition modes, the user can browse the visual environment using the arrow keys. The mouse pointer coordinates are shown in the upper-left part of the interface.
Display layers roles
The TMX format data file used to describe the visual environment of the area is composed with one or many display layers. Lives Out uses these layers to determine how to rely on graphical elements of the environment relatively to the current scene. By default, the BACKGROUND role is assigned to all layers, so that all graphical elements will be displayed in the scene, behind the characters. However, it is possible to set a layer's graphical elements to be displayed in front of the characters, or to use them for collision computations (walls and other obstacles).
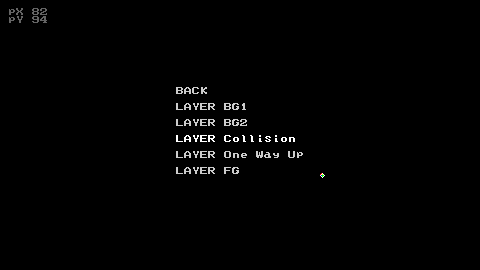
By selecting "SET LAYER ROLES" in the main menu, the user can configure the roles of all the layers available within the active area of the episode.
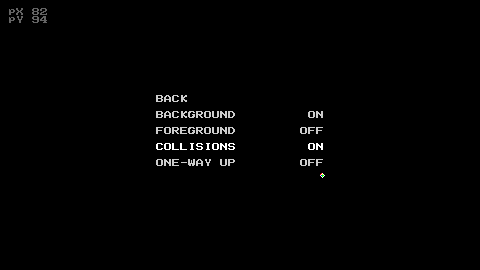
After selecting a display layer by name, another menu allows the user assigning one or many roles among the 4 ones currently supported by the game (see details in the table below).
| Role | Use |
| BACKGROUND | display layer used to draw graphical elements behind NPCs and the player character. They are lit by the area's enabled light sources |
| FOREGROUND | display layer used to draw graphical elements in front of NPCs and the player character. They are not affected by the area's enabled light sources and will remain in the dark |
| COLLISIONS | display layer used to compute collisions in all directions (walls, obstacles) |
| ONE-WAY-UP | display layer used to compute collisions for obstacles that can be crossed from bottom to top (plateforms) |
Respawn
A respawn location for the player character can be added to the active area using the "RESPAWN" edition mode.
In this edition mode, the mouse pointer is a small round colored shape, or the sprite associated to the player character if it has been explicitly added to the episode (see Sprite du joueur section). Existing respawn locations are shown in the same manner, at their respective coordinates.
A left button click on the mouse creates a respawn location at the current mouse pointer coordinates. It is possible to create many of them within a single area. The first one to be created will be used by default for spawning the player character in the episode.
Each respawn location can be used for starting a game or changing areas (see Action section). Its only properties are its coordinates within the area's space.
To delete one or many respawn location, the user may maintain the left button pressed and drag the cursor to draw a rectangle selection containing all the respawn locations to be deleted.
Action
Action spots are the basis for pretty much all interactions inside areas. When the player character enters the boundaries of an action spot, the associated action can be triggered either manually (by pressing the action button) or automatically, depending on its configuration. That is, it is not necessarily a conscious player action that leads to an action spot's activation.
To create a new action spot, the user must maintain the left button pressed and draw a rectangle selection that will define its boundaries. A single click inside an action spot allows the user selecting it for edition. Creating or editing an action spot opens a dedicated menu.

From this menu, it is possible to browse to the previous or next action spots in the same area (PREVIOUS and NEXT options respectively), to configure the action spot properties, or to delete it (DELETE option).
Various action types exist in this context. Each one of these has its own special per-type property value, and also a few general properties. Many of these action types are the same that will also be triggerable via storyboard events down the line (see Storyboard section). The edition of the action spot type along with its special per-type property can be done respectivement with the TYPE and DATA options in the menu.
Available action types
| Type | Parameter | Use |
| LOAD MAP | destination area and respawn location to be used in it (format "area-location") | A good example of a LOAD MAP type action spot would be a door or window, leading the player character to another episode area. |
| CHANGE STORYBOARD PHASE | storyboard phase ID | A storyboard phase change can be useful to trigger cinematics, contained within a single phase, and to be played back after a gameplay sequence in the same area. |
| ATTENDED SPEECH | part number in the episode's script | This action type can be used when the player character has to speak to another character or read a document found on the path, to give text display control to the player, hence the "attended" qualificative. |
| UNATTENDED SPEECH | part number in the episode's script | Same use than the previous type, but this time leaving character control to the player instead of focusing it on text, allowing the latter to be shown automatically. Useful for mood-setting dialogues, during gameplay. |
| SET LIGHT | light type | This action type allows the player character enabling a specific lighting mode for the scene, that is to switch on his torch or smartphone for instance. Each lighting type has its own rendering method and contributes to the scene's mood differently. |
| START AUDIO PLAYBACK | audio track ID | This action type is useful to trigger playback of a given audio track (music of sound effect). In practice, it is mostly used to support another action and is chained with it. |
| STOP AUDIO PLAYBACK | audio track ID | This action type is complementary to the previous one, but is used mostly to finish playback of an audio track before starting another's. This is an abrupt playback stop. For a more progressive one, the next action type is more appropriate. |
| FADE AUDIO OUT | audio track ID | Can be used to decrease an audio track playback volume progressively over time (mostly useful for music tracks). |
General action type properties
| Property | Parameter | Use |
| AUTO | ON/OFF | Determines if the action associated to this spot will automatically triggered as soon as the player character enters its boundaries or if manual intervention (i.e. action button pressed) will be necessary. During the design of an average episode, most action spots have this property set to ON. In practice this property can be combined with mood-setting dialogues, using the UNATTENDED SPEECH action type, but also for triggering playback of audio tracks, which is by no means a conscious action of the player. |
| VOLATILE | ON/OFF | Détermines if this action spot can be triggered more than once. If set to ON, an action spot will disappear as soon as it has been triggered. Otherwise it can be triggered again. In practice, some actions like door openings should be done as many times as the player wants and never be marked as volatile, but it is possible to create interesting narrative effects by not applying this principle. |
| LOCKED | ON/OFF | Determines if this action spot is ready for triggering or if it has to be unlocked by another action spot before that (see ACTION CHAIN below). This property makes an action spot "invisible" until it is necessary to a sequence of actions designed by the episode creator. |
| LOCKED BY ITEM | ON/OFF | Determines if this action spot is available or not depending on the presence of a specific item in the player's inventory. This property is useful to deem certain items as "keys" to access some locked parts of an episode. |
| FORBID ITEM | ON/OFF | If the availability of an action spot depends on the presence or not of a specific item in the player's inventory (see LOCKED BY ITEM property above), this property determines if the presence of this object forbids access to the action spot or authorizes it. It is useful to allow triggering some actions only if an item has not been collected yet for example. |
| ACTION CHAIN | ON/OFF | Determines if triggering of the action associated to this spot unlocks an "invisible" action, that is another action spot whose LOCKED property is set to ON. The next property indicates which action spot is to be unlocked. |
| CHAINED ACTION | action spot ID to unlock | When this action spot triggers the activation of another in a chain, this property indicates which one. It can be any action spot within the active area. But it is not possible to impact an action spot in another area of the episode using this technique. |
| INFO | part number in the episode script | This property indicates what text should be displayed when the action spot is ready to be triggered by the player. In practice, it is mostly used for conscious player actions, such as "Talk" or "Use". The episode designer has to write the text content in the episode script (see Scenario scripts section). |
Items
An item is something that the player can collect and put into his inventory. It can be pretty much any object in our daily routines, but by design they have to be easily carryable, and they have to be combinable with others to craft new ones from the status interface in-game. This edition mode allows placing items inside an area so that they are available when loading it. Note that the player may also drop items along the way, and thus add more to the area he is in, dynamically.
To create a new item placement, the user only has to click at the coordinates where the item should be located within the area. To edit an item that is already set up in the area, it has to be selected by maintaining the left button pressed and drawing a rectangle selection around it.
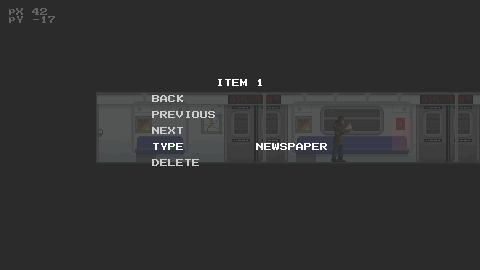
From the edition menu, the user may browse to the previous or next items (PREVIOUS and NEXT options respectively) in the active area, configure its properties, or delete it (DELETE option). The item type picked by the user determines its use for the player. For more information about available item types, read the Lives Out codex.
NPC
An NPC or Non-Playable-Character is an animated entity in the game, that can spawn in an area and influence the player or his environment depending on its configured behavior. The game engine controls these entities using a very simple artificial intelligence, only to simulate some level of autonomy.
To create a new NPC, the user needs to click at the coordinates where it should be placed within the active area. To edit an NPC already set up in the area, the user needs to select it by maintaining the left button pressed and drawing a rectangle selection containing it.
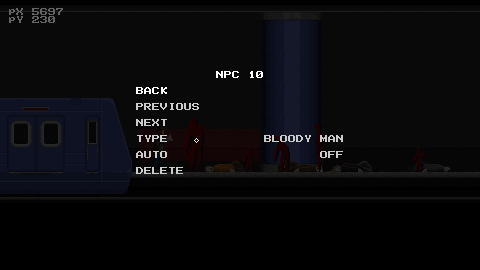
From the edition menu, the user may browse to the previous or next NPC (PREVIOUS and NEXT options respectively) in the active area, configure its properties, or delete it (DELETE option). The NPC type chosen by the user determines its behavior in-game, as well as its appearance and animation.
Available NPC types
| Name | Description |
| BLOODY NEMESIS | This special, hostile NPC moves toward the positive X-axis, progressively accelerating. When the player is caught, the state of the game changes to Game Over instantly. It is not possible to interact with this NCP otherwise at the moment. |
| BLOODY MAN | This hostile NPC was born out of a man's shape. Once awaken, it will target the player, or one of the nearby energy sources (lights). |
| BLOODY OLD | This hostile NPC was born out of an elder's shape. Once awaken, it will target the player, or one of the nearby energy sources (lights). |
| BLOODY CHILD | This small hostile NPC was born out of a child's shape. Once awaken, it will target the player, or one of the nearby energy sources (lights). |
| BLOODY WOMAN | This hostile NPC was born out of a woman's shape. Once awaken, it will target the player, or one of the nearby energy sources (lights). |
General properties of NPCs
| Property | Parameter | Use |
| AUTO | ON/OFF | Determines if this NPC is to be automatically spawned when the area is loaded or if its instantiation in-game needs to be triggered via another way (action spot for example). By default this property is OFF. |
Light sources
Lives Out uses a dynamic lighting system. The LIGHT edition mode allows the user setting up light sources in the area, the same way that items or NPCs can be. These light sources have an influence on how the scene is lit but also on gameplay, as NPCs react to light in various flavors. A well-designed area should balance these two types of entities to set the player into problem solving situations and make his progress more interesting.
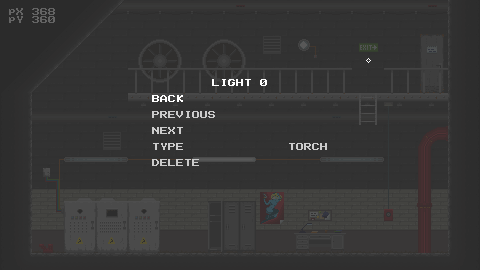
From the edition menu, the user can browse to the previous or next light sources (PREVIOUS and NEXT options respectively) in the active area, configure its properties, or delete it (DELETE option). The appearance of the light source, how it lights the environment and how it affects gameplay all depend on its type (see details below).
Available light source types
| Name | Description |
| NO LIGHT | This light source is off and does not affect the environment. It is possible to switch off all lights sources in the game by controlling their type and changing it into this one. |
| PHONE | This light source imitates the directional light of a smartphone. It is pretty weak. |
| TORCH | This is an omnidirectional light, with strong intensity within a limited radius. |
| FLASHLIGHT | This directional light source is more powerful than PHONE, and lights the path efficiently on a fair distance. |
Storyboard
The storyboard is what controls what happens independently from the player actions, depending on the elapsed time only. This mechanism is useful to create cinematics mostly, but is of limited use in gameplay.
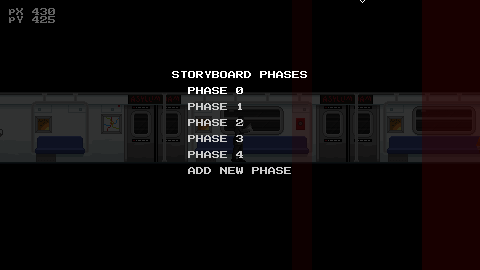
An episode storyboard is composed with "phases". Each phase has a few general properties, and is composed with a list of events. The storyboard edition interface is thus made of nested menus, the root menu being the phase list, from where more can be added at will (ADD NEW PHASE option).
Selecting a phase opens the phase property edition submenu.
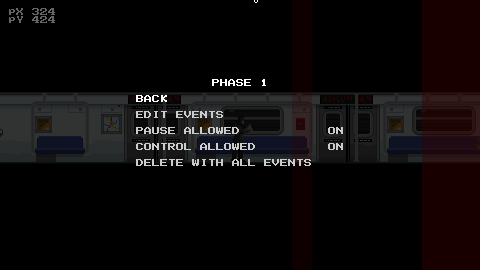
In this menu, it is possible to check the list of events within the selected phase (EDIT EVENTS option), to delete the phase completely along with all the events it contains, or to edit its general properties:
| Property | Parameter | Use |
| PAUSE ALLOWED | ON/OFF | Determines if during this phase, the player can pause the game or not. To be used with caution, and on as short durations as possible to avoid causing frustration for not being able to control the program. |
| CONTROL ALLOWED | ON/OFF | Determines if the player can control the character during this phase or not. This property is enabled in practice during gameplay phases and disabled during cinematics phases. |
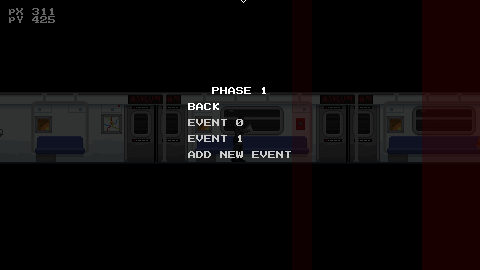
When the user picks the EDIT EVENTS option, the program presents him with yet another submenu containing the list of all the events in the phase being edited, and from here he can add more of them (ADD NEW EVENT option).
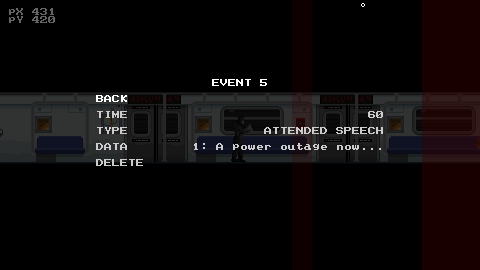
Selecting an event opens its edition submenu where the user can change its type, the associated parameter and mostly its triggering time.
Like an action spot, an event can have one of the following types:
| Type | Parameter | Use |
| END PHASE | none | This event is self-explainatory, and marks the end of the phase containing it. When triggered, the current phase's execution stops. The design can decide to switch to another phase before that to continue the story he imagined, or stop there and there won't be anything happening after that. |
| CHANGE PHASE | phase ID | Triggers a storyboard phase change to the one specified as a parameter. The goal here is often to give control to the player or take it away from him depending on the unrolling of cinematics. |
| ATTENDED SPEECH | (see Action section) | |
| START AUDIO PLAYBACK | (see Action section) | |
| STOP AUDIO PLAYBACK | (see Action section) | |
| FADE AUDIO OUT | (see Action section) | |
| SET LIGHT | (see Action section) | |
| CHANGE AREA | (see Action, option "LOAD MAP" section) | |
| CHANGE GAMESTATE | game state ID | This special event allows exiting the game and returning to the main menu or go to the credits roll sequence for example. It is very "final" and is to be used in rare occasions only of course. |
| RESTORE LIGHT | Lighting type | As the name implies, this type of event restores a given lighting type. |
Scenario scripts
The unrolling of a scenario as defined by the designer/writer for the episode depends in great part on the script. It contains dialogues and other written information that can be used within the episode, from action spots, events or action descriptions.
Only one script can be associated to an episode. To load a script, the user may use the SET SCRIPT option of the main menu. The file choice interface is opened and allows the user to select the file he wishes to load into the episode in the runtime folder.
The script format is that of a simple text file, easy to edit using a basic text editor (Wordpad or VIM for instance). It should be composed with numbered parts. Like this:
0
blablabla
blablablabla
blabla

1
Use

2
"And they would live happily ever after...
... or not."
Each part must start with its number. Lives Out's script engine relies on line feeds as markers to leave control to the player in a regular fashion, or at least pause for a short moment the dialogue display.
At the time the script is imported into the program, it is converted into a binary format which is optimised to be stored in the episode's resources file. When the designer/writer makes a change in the source text file, he has to import it again to apply changes in the episode as well.
Episode metadata
Episode metadata are what describe it in an external manner, so that a preview can be provided to the player in the episode selection interface of the game. This data has little to no use during gameplay itself. The goal is only for the selection interface to determine the episode number and its title as a first step. Otherwise, an episode would be identified by s00e00 (season 0 / episode 0) and would not have a title.
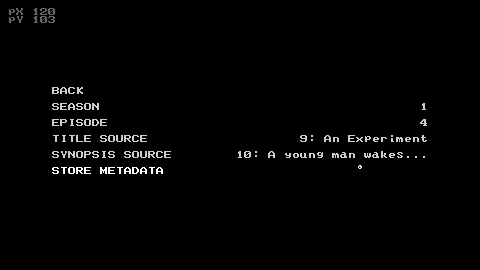
There are currently 4 metaproperties that can be changed within the editor (see details in the table below).
| Metaproperty | Use |
| SEASON | season number |
| EPISODE | episode number within the season it belongs to |
| TITLE | an entry in the scenario script in use that determines the text that should be used for the episode title |
| SYNOPSIS | an entry in the scenario script in use that determines the text that should be used for a short description of the episode's content |
Player sprite
By default Lives Out uses the character sprite of the pilot episode if no dedicated sprite has been imported into the episode. In that case, the editor will use a small round colored shape to mark respawn locations in each area (see Respawn section).
If the designer wishes to introduce a new playable character in the episode, it is possible to import a spritesheet with the SET SPRITE option of the main menu. The file choice interface opens to allow the user selecting the image file in the program's runtime directory.
The image file format to import here is very strict for the process to work, and has to abide by the following set of constraints:
- PNG RGBA (with transparency)
- Total size: 1728x216 pixels
- Frame size: 32x54
- 27x4 frames of left-oriented animations
- 27x4 frames of right-oriented animations
- Left and right animation frame mirroring each other
- IDLE_PREGAME animation of 1 frame, at column 24, line 0
- IDLE_NO_LIGHT animation of 27 frames, at column 0, line 3
- IDLE_TORCH animation of 27 frames, at column 0, line 1
- IDLE_PHONE animation of 27 frames, at column 0, line 2
- WALK_NO_LIGHT animation of 8 frames, at column 16, line 0
- WALK_TORCH animation of 8 frames, at column 0, line 0
- WALK_PHONE animation of 8 frames, at column 8, line 0
A bad format will either cause a loading error, or display glitches in the game when running the episode.
Configuration
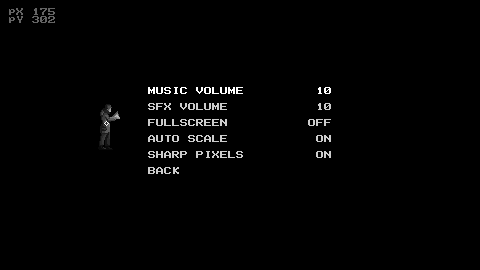
The following general options can be configured within the OPTIONS submenu (accessible from the main menu):
| Option | Use |
| MUSIC VOLUME | music previews volume |
| SFX VOLUME | sound effects previews volume |
| FULLSCREEN | to enable/disable the fullscreen editor display mode |
| AUTO SCALE | to enable/disable automatic resize of the edition viewport to fit the size of the program's window (the interface can seem very small in its starting dimensions) |
| SHARP PIXELS | allows the user to enable or disable linear filtering on resized pixels, making them appear either fuzzy or sharp. |
Each of these options is persistent, and is restored on program start-up. Their values are stored in the "loe.conf" configuration file, along with one more property that is not editable inside the editor, "currentResources", that allows the user setting by hand which episode file to load when starting the editor program.